Configure your checkout
Secure Acceptance Hosted Checkout is your secure hosted customer checkout experience.
It consists of a single page payment form to:
- capture payment card data and
- process transactions
This in turn enables you to simplify your Payment Card Industry Data Security Standard (PCI DSS) compliance and reduce risks associated with handling and/or storing sensitive payment card information.
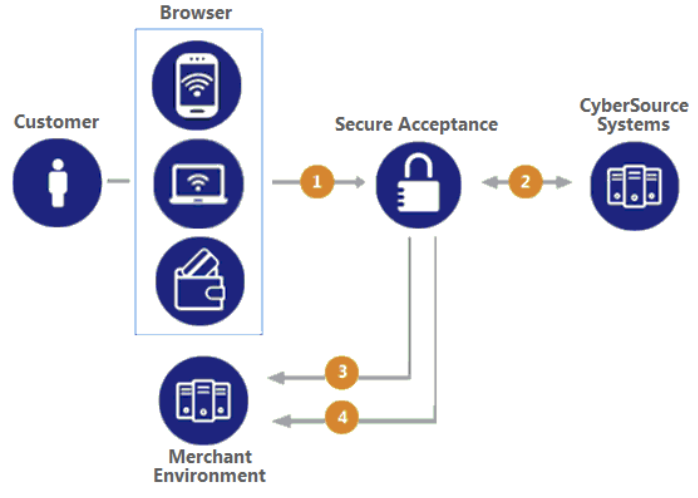
Secure acceptance hosted checkout transaction flow:
To set up your customer checkout experience, you need to create a secure acceptance profile and configure the required settings.
Configure payment types, currencies and 3D-Secure
You must configure at least one payment method before you can activate a profile.
In the left navigation panel, choose Payment Configuration > Secure Acceptance Settings.
Secure Acceptance Settings page is displayed.
Select a profile.
General Settings page is displayed.
Click Payment Settings.
Payment Settings page is displayed.
Click Add Card Types.
A list of card types is displayed.
Select Visa and Mastercard.
For American Express please contact ngwtechsupport@fisglobal.com. Other payment methods are not currently supported.
Click the settings icon for each card type.
The card settings and currencies lists are displayed.
Check CVN Display to display the card verification number, CVN field on Secure Acceptance.
The customer decides whether to enter the CVN. We recommend that you display the CVN to reduce fraud.
Check CVN Required. The CVN Display option must also be checked.
If this option is checked, the customer is required to enter the CVN. It is recommended that you require the CVN to reduce fraud.
Check Payer Authentication. Choose 3D Secure 2.0.
Check the currencies for each card.
By default, all currencies are listed as disabled. Select GBP.
For other currencies please contact ngwtechsupport@fisglobal.com.
Click Submit.
The card types are added as an accepted payment type.
Click Save.
Configure payment form and address fields
The payment form is the customer’s checkout experience. It consists of either a series of pages or a single checkout page in which the customer enters or reviews information before submitting a transaction.
Select the fields that you want to get displayed on the single checkout page or on each page of the multi-step checkout process: billing, shipping, payment and order review.
Follow the steps given below to configure the Payment Form:
In the left navigation panel, choose Payment Configuration > Secure Acceptance Settings.
Secure Acceptance Settings page is displayed.
Choose a profile.
General Settings page is displayed.
Click Payment Form.
Payment Form page is displayed.
Choose the payment form flow:
Choose Single page form for which the checkout process consists of one page on which the customer enters or reviews information before submitting a transaction.
NoteDo not click Save until you have selected the billing or shipping fields, or both.
Check Display the total tax amount in each step of the checkout process.
The total tax amount must be included in each transaction. Calculate and include the total tax amount in the
tax_amountfield.NoteDo not click Save until you have selected the billing or shipping fields, or both.
Check Billing Information.
Select the customer billing information fields that you want to get displayed on Secure Acceptance. If these fields are captured at an earlier stage of the order process (for example on your web site), they can be passed into Secure Acceptance as hidden form fields. See Request Fields here.
The options for each field are:
Option Description Display The customer can view the information displayed in this field. Choose this option if you want to pre-populate the billing information fields when Secure Acceptance Hosted Checkout is rendered. These fields must be passed into Secure Acceptance as hidden form fields. Edit The customer can view and edit the billing information on the Secure Acceptance Hosted Checkout. When you select this option, the display option is automatically selected. Require The customer is required to enter the billing information on the Secure Acceptance Hosted Checkout before they submit the transaction. When you select this option, all other options are automatically selected. Check Shipping Information.
Select the shipping information fields that you want to get displayed on Secure Acceptance.
The options for each field are:
Option Description Display The customer can view the information displayed in this field. Choose this option if you want to pre-populate the shipping information fields when the Secure Acceptance Hosted Checkout is rendered. These fields must be passed into Secure Acceptance as hidden form fields. Edit The customer can view and edit the shipping information on the Secure Acceptance Hosted Checkout. When you select this option, the display option is automatically selected. Require The customer is required to enter the shipping information on the Secure Acceptance Hosted Checkout before they submit the transaction. When you select this option, all other options are automatically selected. Choose whether to mask sensitive fields. We recommend you to mask the sensitive fields.
Click Save.
Configure merchant notifications
You can use merchant notifications to listen to payment outcomes by email or as an HTTPS POST to a URL for each transaction processed. Both notifications contain the same transaction result data.
Follow the steps given below to configure merchant notifications:
In the left navigation panel, choose Payment Configuration > Secure Acceptance Settings.
Secure Acceptance Settings page is displayed.
Choose a profile.
General Settings page is displayed.
Click Notifications.
Notifications page is displayed.
Choose a merchant notification in one of two ways:
Check Merchant POST URL.
Enter the HTTPS URL. Secure Acceptance sends transaction information to this URL. For more information, see Response Fields.
NoteOnly an HTTPS URL supporting TLS 1.2 or higher should be used for the merchant POST URL.
Check Merchant POST Email.
Enter your email address.
Secure Acceptance sends transaction response information to this email address including payment information, return codes and all relevant order information.
Choose the card number digits that you want to get displayed in the merchant or customer receipt:
- Return payment card BIN: displays the card's Bank Identification Number (BIN), which is the first six digits of the card number. All other digits are masked: 123456xxxxxxxxxx
- Return last four digits of payment card number: displays the last four digits of the card number. All other digits are masked: xxxxxxxxxxxx1234
- Return BIN and last four digits of payment card number: displays the BIN and the last four digits of the card number. All other digits are masked: 123456xxxxxx1234
Click Save.
Configure response pages
You must configure the customer response page before you can activate a profile. You can choose to have a transaction response page displayed to the customer at the end of the checkout process, and a cancel response page displayed during the checkout process. Enter a URL for your own customer response page.
Follow the steps given below to configure a Hosted Response Page:
In the left navigation panel, choose Payment Configuration > Secure Acceptance Settings.
Secure Acceptance Settings page is displayed.
Choose a profile.
General Settings page is displayed.
Click Customer Response.
Customer Response page is displayed.
Under the Transaction Response Page heading, check Hosted by You.
Enter the URL for your customer response page.
- Use port 80, 443 or 8080 in your URL.
- Only port 443 should be used with a HTTPS URL.
- Parse the transaction results from the URL according to the reason code and redirect your customer to the appropriate response page.
Under the Transaction Response Message heading, choose a number from the Retry Limit drop-down list.
NoteThe maximum number of times a customer can retry a declined transaction is 5.
Under the Customer Redirect after Checkout heading, enter the redirect URL of the web page. This web page is displayed to the customer after the checkout process is completed.
Under the Custom Cancel Response Page heading, check Hosted by You.
Enter the URL for your customer response page.
- Use port 80, 443 or 8080 in your URL.
- Only port 443 should be used with a HTTPS URL.
- Parse the transaction results from the URL according to the reason code and redirect your customer to the appropriate response page.
Click Save.